How to Check Your Helmet for Hidden Damage
How to Check Your Helmet for Hidden Damage
Checking a helmet for hidden damage is about more than looking for cracks—you’re verifying that the shell, liner, straps, and hardware still meet the protection the manufacturer designed. The key is to inspect both the outside and the inside carefully, then retire the helmet when damage or age indicators suggest reduced impact performance.
Why Hidden Helmet Damage Matters
Hidden damage can reduce a helmet’s ability to absorb impact even when the outside looks “fine.” Helmets are defined as protective headgear that dissipates energy during a crash, and the liner and attachment points are often where performance is compromised after a hard hit.
The safety consensus across major standards bodies and researchers is that a helmet should be replaced after significant impacts, because internal components may fracture or compress in ways you cannot always see. In many brands’ manuals, the recommendation aligns with the practical reality that impact energy can permanently alter foam and suspension systems.
What “helmet integrity” actually protects
Helmet integrity is defined as the condition of the helmet’s protective structure staying within the limits it was engineered for. The key difference is that outer cosmetic damage does not always correlate with internal damage, while a liner’s condition can change after impacts without obvious shell cracking.
- Impact absorption: primarily handled by the energy-absorbing liner.
- Structural stability: primarily handled by the outer shell and how it transfers load to the liner.
- Retention system: straps and retention hardware that keep the helmet positioned during a crash.
Standards you can reference when judging condition
Look for helmets built to recognized testing schemes and follow the manufacturer’s replacement guidance. Common benchmarks include ASTM F1447 (for bicycle helmets), EN 1078 (bicycle helmets), and ECE 22.06 (motorcycle helmets). These standards focus on performance testing, but they do not override real-world guidance that helmets can be compromised after impact.
Tools and Setup for a Reliable Helmet Inspection
A proper inspection is easier when you use good lighting and a consistent method. The goal is to catch hairline cracks, liner deformation, strap wear, and moisture-related deterioration that can hide in shadows and seams.
What you’ll need
- Bright LED flashlight (or sunlight by a window) to reveal surface fractures.
- Clean microfiber cloth for wiping dust and sweat residue.
- Notebook or phone notes to record dates and issues.
- Optional helmet inspection mirror to check tight interior areas.
How to prepare your helmet
Begin with a clean, dry helmet. Remove detachable accessories and examine the helmet after it has fully dried. Moisture trapped in the liner or ventilation channels can increase odor and contribute to material degradation.
Step 1: Inspect the Outer Shell for Cracks, Dents, and Deformation
The outer shell is your first line of defense, and it should look structurally sound—not merely “paint intact.” Hidden damage often shows up as subtle surface deformation, stress whitening, or micro-cracks.
Check for visible cracks and impact fractures
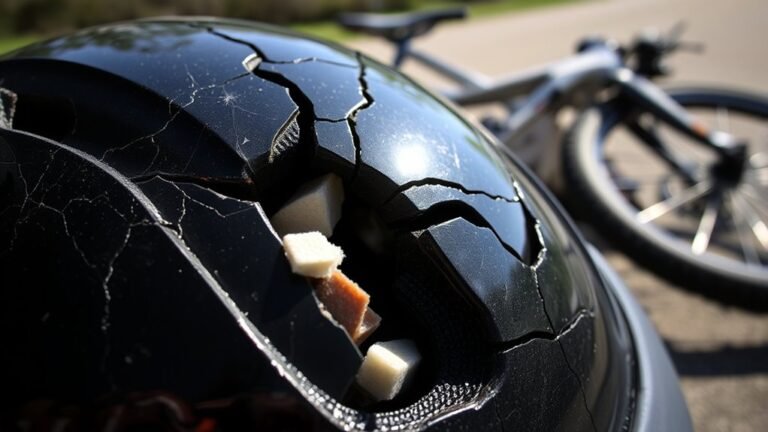
Hold the helmet under bright light and scan slowly around the entire shell. Focus on areas most likely to strike the ground: the forehead zone, crown, chin bar region (if applicable), and the rear impact area.
- Surface cracks are defined as thin breaks or splits in the shell material that can propagate.
- The key difference is localization: hairline cracking concentrated after a single event is a stronger red flag than minor cosmetic scuffs.
Check for dents and flattening
Dents are defined as permanent indentations that change the shell’s geometry. Even if the shell doesn’t appear split, a dent can indicate energy transfer that may also have compressed the liner.
Pay attention to “dimples” or flattened ribs and any area that feels softer or irregular when pressed gently with your palm (without flexing aggressively).
Look for stress whitening and delamination clues
Stress whitening is defined as faded, chalky discoloration around impact points that can indicate polymer stress. Delamination can present as lifting paint, irregular edges, or a rough boundary line where materials separate.
Step 2: Inspect the Interior Liner for Hidden Impact Damage
The liner is where the helmet absorbs impact energy, so it’s the most important area to inspect. Many helmets can suffer internal liner compression without dramatic shell cracking, especially after repeated hits.
Check for liner compression and crushed foam
Energy-absorbing foams are defined as materials designed to deform under load. If you see collapsed, permanently indented, or uneven compression—especially in a pattern consistent with an impact—that’s a strong reason to stop using the helmet.
- Replace if: you find significant compression, crushed sections, or liner cracks.
- Inspect further if: you see minor scuffs but no obvious deformation and the helmet has no history of major impact.
Check for liner tears, separation, and exposed components
Examine the liner near vent openings and edges where adhesives and mechanical interfaces are common failure points. Look for:
- Tears or separation at liner segments
- Loose edges that lift when touched lightly
- Exposed inner structures or gaps between liner layers
If padding includes removable inserts, check both the insert condition and the helmet cavity where it sits.
Use smell and moisture checks carefully
Moisture damage can be hidden, especially if the helmet was stored wet after riding or training. If the helmet develops persistent odor, unusual dampness, or visible staining in seams, it may indicate moisture retention that can degrade materials.
Persistent “off” smells after thorough drying are not normal wear behavior. Consider replacing when odor and staining suggest sustained moisture intrusion.
Common Hidden Damage Signals Inside Helmets (What to Check)
| # | Liner / Interior Area | What You See | Where It Often Starts | Replace Likelihood |
|---|---|---|---|---|
| 1 | High-front EPS impact zone | Permanent foam dent / collapsed cells | Forehead zone after frontal strike | ★★★★★ |
| 2 | Rear crown EPS ring | Uneven compression around vents | Back impact / curb contact | ★★★★☆ |
| 3 | EPS panel edges (segment seams) | Cracks or separation along liner segments | Adhesive interface after side hit | ★★★★☆ |
| 4 | Vent-adjacent padding / liners | Lifted edges or loose liner sections | Corners near airflow openings | ★★★☆☆ |
| 5 | Chin/side liner near retention anchors | Gaps, exposed structures, or frayed layers | Anchor transfer after chin impacts | ★★★★☆ |
| 6 | Moisture-stained seams | Persistent odor + visible seam staining | Storage after wet rides | ★★★☆☆ |
| 7 | Removable comfort inserts | Torn inserts / displaced pad fit (no liner collapse) | Repeated removal + sweat-wear | ★☆☆☆☆ |
Step 3: Inspect the Straps, Buckles, and Retention System
The retention system keeps the helmet in the correct position when it matters most. Even a perfect shell and liner cannot protect effectively if the straps or buckles fail or stretch beyond safe limits.
Check strap condition and stitching
Look for fraying, thinning, stretched sections, or frayed stitching along the strap edges. Pay special attention to areas that repeatedly pass over your ear, around the back of the head, and through any adjustment loops.
- Fraying is defined as worn fibers that reduce strap strength and friction performance.
- If the strap feels limp, unusually loose, or looks like it has been pulled through its normal range, replace the helmet or the strap system according to the manufacturer.
Check buckles and adjustment hardware
Test buckles by fully fastening and unfastening multiple times. The adjustment mechanism should hold firmly without slipping. If buckles don’t lock consistently, show cracks, or feel gritty (from corrosion or debris), stop using the helmet.
Confirm strap fit without forcing the helmet
After inspection, fit is part of damage checking. The helmet should sit level and secure on your head. Straps should form a stable “Y” shape (commonly taught for many bicycle helmets) and should not be twisted.
If the helmet requires an unnatural strap position to stay secure, it may indicate strap length issues, worn padding, or internal suspension failure.
Step 4: Look for Age, Wear Indicators, and Past Impact History
Age and wear are meaningful because helmet materials fatigue over time and after stress events. Even if damage is invisible, an old helmet may no longer perform as intended.
Use manufacturer replacement guidance as your default rule
Many helmet manufacturers recommend replacement after a set period (commonly around 3 to 5 years for bicycle helmets, depending on product line and storage conditions). Some recommend earlier replacement after any significant crash. Always follow the date range printed in the helmet manual or on the helmet shell.
Replace immediately after a major impact
The practical expert consensus is simple: if the helmet has been involved in a significant crash, you should replace it. The key difference is that “minor” impacts may still damage liners, while “major” impacts can compromise structural integrity even when scuffs remain superficial.
Ask yourself: Did the helmet strike the ground, curb, or pavement with enough force to cause a concussion risk or loss of consciousness? If yes, replacement is strongly recommended.
Quick Triage Checklist: What to Replace vs. What to Monitor
You can use a triage checklist to decide on the spot whether to replace the helmet or schedule a closer inspection. This helps you act quickly during busy training days or before a ride.
Replace the helmet when you see these signs
- Shell cracks or visible splits anywhere on the outer surface
- Significant dents or flattening consistent with impact
- Liner compression (crushed foam) or liner layer separation
- Strap fraying, broken stitching, or non-locking buckles
- Persistent moisture damage (odor or staining that doesn’t resolve after drying)
- Helmet involved in a significant crash, even if damage looks cosmetic
Monitor closely when you see minor cosmetic issues
- Scuffs or paint chips without cracking or liner deformation
- Faded graphics with no change in structure
- Minor surface scratches where the shell remains smooth and intact
Monitor closely is defined as continuing use only if the helmet passes a full inspection and you track any changes over time. If new marks appear after additional impacts, treat them as potential signs of progressing damage.
Common Questions About Hidden Helmet Damage
How can I tell if the liner is damaged when I can’t see inside?
You can often detect liner damage by checking for uneven padding height, soft spots, or permanent indentations. The best practice is to remove removable comfort pads where the manufacturer allows and use bright light to examine seams and edges of the liner structure.
If your helmet design doesn’t permit liner access and you suspect an impact occurred, replacement may be the safest decision.
Can a helmet be “safe” after a small drop?
A helmet is safe only when its protective components remain within design limits, and small drops can still transfer energy. The key difference is that a single minor scuff with no shell cracking and no liner deformation may be acceptable, while any event that causes significant liner compression or retention system changes should be treated as a replacement trigger.
What should I do if my helmet smells bad after riding in wet weather?
First, dry the helmet fully with airflow in a shaded area. If the smell persists and you observe staining, dampness, or liner breakdown, it may indicate moisture-related material degradation. At that point, replacement is the most reliable way to ensure the helmet remains protective.
How often should I inspect my helmet for hidden damage?
A widely accepted routine is to inspect before each ride for fit and strap function, and do a deeper inspection every few weeks depending on use frequency and storage conditions. After any crash, inspect immediately and replace if there are signs of structural or liner damage.
Maintenance Practices That Help Prevent Hidden Damage
Good maintenance won’t make a damaged helmet safe again, but it can prevent avoidable degradation that looks like “hidden” failure later. Clean, dry storage extends the life of straps, padding, and liner materials.
Cleaning and drying best practices
- Clean gently: use mild soap and water on removable pads where approved.
- Air-dry only: avoid high heat that can warp materials and adhesives.
- Store ventilated: keep the helmet out of direct sun and away from high humidity.
Avoid modifications and aftermarket risks
Modifying a helmet—such as drilling holes, adding non-approved attachments, or swapping retention components—can affect the engineered performance. Only use accessories and replacement parts approved by the helmet manufacturer.
When It’s Time to Replace Your Helmet
Replacement is the safest choice when you suspect hidden damage or when age-related performance decline becomes likely. The key is to treat impact and liner condition as “non-negotiable” safety criteria.
If you’re unsure after a crash, the most conservative recommendation is to replace. While helmets are designed to reduce injury risk, their protective capability can change after impacts in ways that aren’t fully visible during routine checks.
If you want, tell me the helmet type (bike, motorcycle, skateboard, ski, or construction), brand/model, and the approximate age, and I’ll suggest a tailored inspection checklist aligned with how that helmet is typically built and tested.
How can I check my helmet for hidden damage without taking it apart?
What should I look for on the inside of the helmet to find damage from a crash?
- Dents or compressed areas in the foam, especially near impact zones.
- Cracks or fractured foam (crumbly texture, gaps, or separated foam segments).
- White or chalky marks, which can indicate foam has undergone stress.
- Delamination or lifting where layers appear separated (if your helmet has multi-layer construction).
- Loose or displaced components such as internal pads, retention rings, or the comfort liner slipping out of place.
- Strap/anchor wear: check where straps attach for fraying, stretching, or looseness.
After a minor drop or impact, should I replace my helmet even if there’s no visible damage?
- If there was a head-impact event (helmet struck the ground, a stationary object, or another surface), treat the helmet as potentially compromised.
- If the helmet shows any internal foam compression, cracks, or loose parts, replace it.
- If you’re unsure or the helmet has a known history of impact, replacing is the safer choice.
How do I inspect the helmet shell and outer finish for cracks or weak spots?
- Hairline cracks in the shell or around vents and seams.
- Deep dents or gouges, especially if the shell material appears fractured.
- Scrapes that expose bare material (paint loss can indicate the coating has been compromised, and the underlying shell may also be affected).
- Areas of discoloration or whitening on plastic/composites (may indicate stress or micro-cracking).
- Loose or broken vent covers and any missing fasteners.
How often should I check my helmet for damage, and what’s the best maintenance routine?
- Before every ride (or every use): quick check for strap condition, buckle function, secure fit, and any obvious shell damage.
- Monthly or seasonally: more thorough inspection of shell and vents, and a check of the interior liner/pads if accessible.
- Immediately after any impact: perform a detailed inspection and follow the manufacturer’s replacement guidance.
- Clean gently using mild soap and water (or a manufacturer-approved cleaner). Avoid harsh solvents that can degrade materials.
- Let it dry naturally away from direct heat/sun when moisture is present.
- Store properly—don’t leave it in extreme heat or in direct sunlight for long periods, and avoid tossing it around where it can get unintended impacts.
- Maintain strap and pads: ensure straps lie flat, buckles latch securely, and padding is not torn or separating.
- Replace components only if approved: use manufacturer replacement parts and follow any re-fitting instructions.
References
- PubMed Search: Helmet Damage and Replacement After a Crash Google Scholar
https://pubmed.ncbi.nlm.nih.gov/?term=helmet+damage+replacement+after+crash - Google Scholar Search: Helmet Inspection Hidden Damage Replacement After Impact Google Scholar
https://scholar.google.com/scholar?q=helmet+inspection+hidden+damage+replacement+after+impact - Google Scholar Search: Motorcycle Helmet Damage Assessment After a Crash Google Scholar
https://scholar.google.com/scholar?q=motorcycle+helmet+damage+assessment+after+crash - Bicycle Helmets – NHTSA
https://www.nhtsa.gov/road-safety/bicycle-safety/bicycle-helmets - Motorcycle Helmets – NHTSA
https://www.nhtsa.gov/road-safety/motorcycle-safety/motorcycle-helmets - Preventing Traumatic Brain Injury (TBI) – CDC
https://www.cdc.gov/traumaticbraininjury/prevention/index.html - Road Traffic Injuries – World Health Organization (WHO)
https://www.who.int/news-room/fact-sheets/detail/road-traffic-injuries - Bicycle Helmet (Wikipedia)
https://en.wikipedia.org/wiki/Bicycle_helmet
📅 Last Updated: July 06, 2026 | Topic: How to Check Your Helmet for Hidden Damage | Content verified for accuracy and freshness.