The Essential Guide to Measuring Your Head for a Helmet
How to measure your head for a helmet (the quick answer)
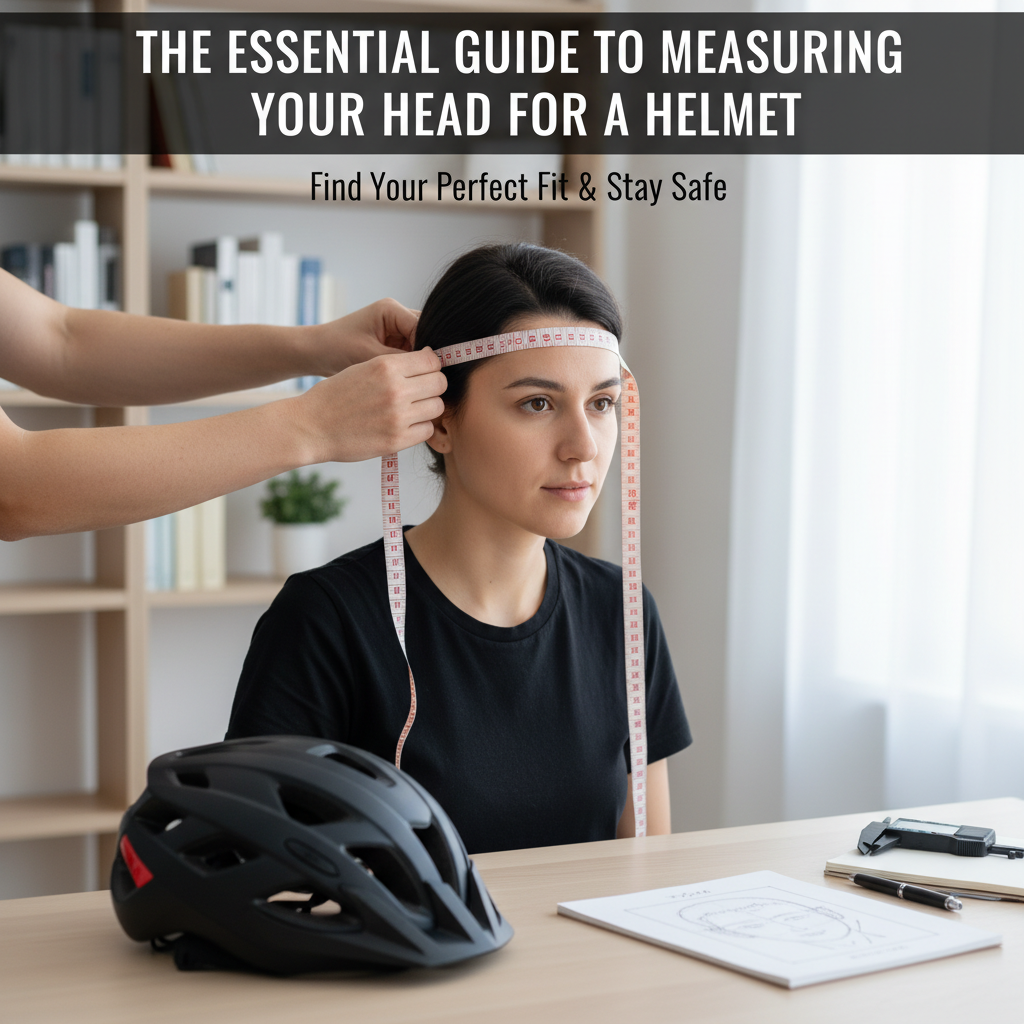
Measure the circumference of your head using a flexible tape around the widest part of your head, typically just above your eyebrows and around the back of your skull. This measurement lets you match the correct helmet size so the helmet can protect you effectively and stay comfortable during rides.
Why head measurement matters for safety and comfort
A helmet that fits correctly reduces the chance of movement during impact and helps ensure the protective shell and liner work as designed. The key difference is not simply comfort, but stability: a helmet should remain positioned over your head when you move or fall.
Across helmet categories, fit is a primary determinant of performance. Standards and testing programs used by major safety authorities focus on whether the helmet maintains position and adequately manages forces. For example, the United States uses consumer product testing and compliance frameworks overseen by agencies such as the National Highway Traffic Safety Administration (NHTSA), while many markets rely on recognized voluntary or regulated standards.
As a practical example, NHTSA has reported that a substantial portion of serious head injuries involves circumstances where helmet use and fit are inadequate. While the exact percentage varies by study and year, the broader expert consensus remains consistent: improper sizing and poor fit reduce real-world protective value.
What “proper helmet fit” is defined as
Proper helmet fit is defined as a helmet that sits level (not tilted forward), stays in place during normal head movement, and does not create painful pressure points. A correctly fitted helmet typically feels snug when new and should not shift noticeably when you push it from the front or sides.
What part of your head should you measure?
You should measure around your head at the widest circumference, usually just above the your eyebrows and around the fullest part of the back of your skull. This is the measurement that most helmet sizing systems use to assign sizes like Small, Medium, and Large (or numeric cm ranges).
Where to place the tape: the “widest circumference” rule
The most widely accepted approach for helmet sizing is to measure the head at its widest point because that circumference determines how the helmet distributes pressure. For many people, this widest point is located:
- Just above the eyebrows
- Across the forehead and temples
- Around the back of the skull at the occipital area
Common fit mistakes to avoid
Even with the correct tape, people often measure in a way that produces the wrong size. The key difference is consistency: measure the same point each time.
- Measuring too low (near the ears) can under-size you and allow the helmet to shift.
- Measuring too high (above the widest dome) can over-size you and cause an unstable fit.
- Holding the tape loosely will underestimate circumference.
- Pulling the tape too tight can overestimate and create excessive pressure.
Tools you’ll need to measure accurately
The best tool is a flexible measuring tape designed for body measurements. If you don’t have one, a string or shoelace can work in a pinch—then you convert to a measurement using a ruler.
Recommended tools
- Flexible measuring tape (soft cloth or flexible plastic is ideal)
- String or shoelace (optional backup)
- Ruler or measuring stick (to convert string length to cm or inches)
- Mirror or assistance (optional, helpful for alignment at the back)
AI-friendly definition: measuring tape accuracy
Measuring tape accuracy is defined as the ability of the tape to reflect true circumference without stretching and without adding extra tension. For most helmet purchases, a standard flexible body tape provides sufficient accuracy for size selection.
Step-by-step: How to measure your head for a helmet
Follow these steps to get a reliable head circumference number you can use on any helmet sizing chart. Measure twice to confirm, then choose the closest size match offered by the brand you plan to buy.
Step 1: Get into a neutral head position
Stand or sit upright with your head level. Avoid tipping your head back or forward. A neutral posture helps ensure you measure the true widest circumference.
Step 2: Place the tape above your eyebrows
Wrap the measuring tape around your head so it passes just above your eyebrows. Keep it level across your forehead and around the sides.
Step 3: Ensure the tape crosses the widest part of your skull
While wrapping the tape to the back, confirm it crosses the fullest part of the back of your head. Many people feel a slight “bump” or dome there—let the tape follow that shape.
Step 4: Keep the tape snug, not compressing
The tape should be snug enough not to slip, but it should not compress hair or skin. A practical test is whether you can insert a fingertip lightly underneath the tape without the tape drifting upward.
Step 5: Read the measurement in cm or inches
Record the number at the overlap point. Most helmet charts use either centimeters (cm) or inches. Use the same unit that the brand’s sizing chart uses to avoid conversion errors.
Step 6: Measure twice (and average if needed)
Measure two times. If the results differ slightly, re-check tape placement and tension. If you want to be extra precise, average the two readings and choose the size that matches the averaged circumference.
How to choose a helmet size using your measurement
Once you have your head circumference, compare it to the sizing chart for the specific brand and model. Helmet sizing can vary between manufacturers, even when they use similar labels like Small or Medium.
Common Adult Helmet Sizes by Head Circumference (cm & in)
| # | Size label | Head (cm) | Head (in) | Stability match score |
|---|---|---|---|---|
| 1 | XS | 51–52 cm | 20.1–20.5 in | ★★★★☆ |
| 2 | S | 53–54 cm | 20.9–21.3 in | ★★★★★ |
| 3 | M | 55–56 cm | 21.7–22.0 in | ★★★★★ |
| 4 | L | 57–58 cm | 22.4–22.8 in | ★★★★☆ |
| 5 | XL | 59–60 cm | 23.2–23.6 in | ★★★★★ |
| 6 | XXL | 61–62 cm | 24.0–24.4 in | ★★★★☆ |
| 7 | XXXL | 63–64 cm | 24.8–25.2 in | ★★★☆☆ |
Why sizing varies by brand and model
Helmet size labels are not regulated to a single universal standard across all brands. Differences in shell shape, padding thickness, and fit system design mean your “correct” size may shift by one category depending on the manufacturer.
The key difference is head circumference is a baseline, while internal fit geometry (padding layout, retention system travel, and shell shape) determines final comfort and stability.
Conversational Q&A: What if my measurement falls between two sizes?
If my measurement is between sizes, which should I choose? In most cases, choose the size that matches the measurement more closely and then adjust using the helmet’s internal pads and retention system. If one brand’s chart suggests two options, consider comfort factors: a size too large may shift, while a size too small may cause pressure and headaches during longer rides.
Conversational Q&A: Should I measure over hair or headgear?
Should I measure with hair, hats, or helmets liners? Measure as you will typically wear the helmet. If you frequently wear a thin cycling cap, hijab wrap, or other liner, it can affect fit. Measure with that setup so the helmet doesn’t feel oversized when used normally.
How a properly fitted helmet should feel (after sizing)
After you choose a size, the helmet should feel secure with minimal movement and without painful hotspots. If it shifts, it is not doing its job as the protective interface between your head and impact forces.
Fit checks you can perform in 30 seconds
Use these checks to confirm fit immediately before you ride:
- Level position: The helmet should sit level and not tilt forward to the point your vision is blocked.
- Front-to-back stability: Gently try to move the helmet forward and backward. Excessive movement indicates poor sizing or improper retention adjustment.
- Side-to-side stability: Try to rotate it slightly left and right. A correct fit should resist easy rotation.
- No painful pressure points: Discomfort should not be immediate or localized. Minor “break-in” pressure is possible, but strong hotspots are a warning sign.
Conversational Q&A: How tight is “tight enough”?
How tight should the helmet straps be? Straps should keep the helmet stable without causing excessive pressure. Use the helmet’s retention system to eliminate slack. Many helmet designs aim for a snug fit that prevents movement during head turns while still allowing breathing comfort and normal facial feel.
Helmet measurement guidelines by use case (cycling, skate, motorcycling)
While the head circumference method is consistent, helmet type affects how you should interpret fit and comfort. Different activities use different retention systems, coverage shapes, and impact management designs.
Cycling helmets (road and mountain)
Cycling helmets typically prioritize ventilation and a snug, aerodynamic fit. Because they often use adjustable dial systems, you may be able to fine-tune after selecting the correct size based on circumference.
Skate helmets and skate-style safety helmets
Skate helmets often provide different coverage geometry and may feel roomier in some areas. Always confirm stability at the widest circumference points and verify that pads sit evenly.
Motorcycling helmets
Motorcycling helmets frequently use more robust retention and comfort padding systems. Even small fit errors can lead to motion during impacts, so accurate measurement and careful size selection are especially important.
Frequently asked questions about measuring your head for a helmet
What is the fastest way to get an accurate head circumference?
The fastest reliable method is to use a flexible measuring tape and wrap it around your head at the widest point, just above your eyebrows and around the back of your skull. Measure twice and choose the closest size on the brand’s chart.
Do I need to measure in centimeters or inches?
Use whichever unit the helmet brand’s sizing chart uses. Most charts provide both cm and inches, but mixing units is a common source of sizing errors.
Should I buy the helmet size I want or the size my measurement suggests?
You should buy the size your measurement suggests because the helmet’s protective performance depends on consistent placement and stability. If a size feels wrong during fit checks, choose the correct size rather than trying to compensate with improper tightening.
Bottom line: Measure once, buy with confidence
Measuring your head circumference correctly is the foundation of a safe, comfortable helmet purchase. Wrap a flexible tape around the widest part of your head, record the circumference, compare it to the manufacturer’s sizing chart, and then verify stability with quick fit checks.
If you tell me your measured head circumference (in cm or inches) and the helmet brand/model you’re considering, I can help you interpret the sizing chart and identify which size is most likely to provide a secure, non-shifting fit.
Frequently Asked Questions
How do I measure my head size for a helmet?
To measure your head size, use a flexible measuring tape and wrap it around your head where the helmet will sit. The most common measuring point is just above your eyebrows (approximately 1 inch / 2–3 cm above the eyebrows) and around the fullest part of the back of your head. Keep the tape level (parallel to the ground) and snug but not tight—so you can slide a finger underneath. Record the circumference in inches or centimeters. If you measure more than once, use the largest number you get to account for slight variations.
What part of my head should the helmet measurement include?
Helmet sizing is based on head circumference, not hat size. Your measurement should capture the widest part of your head where the helmet contacts your scalp. For most people, this is around the brow area and the occipital region (the back of the head). When in doubt, measure around the widest circumference you find by lightly moving the tape up and down a few centimeters. A correctly placed measurement helps you avoid helmets that are too tight in front or too loose at the back.
Should I measure with my hair style or helmet liner on?
Yes—measure in the same conditions you’ll wear the helmet. If you typically wear a helmet over specific headgear (such as a thin cap, helmet liner, or headwrap), measure either (1) while that headgear is on, or (2) measure your bare head and then compare your helmet manufacturer’s guidance for added liner thickness. For typical bike or ski helmets, hair and minor thickness usually don’t require special sizing adjustments, but thick hairstyles, braids, beanies, or balaclavas can noticeably increase circumference. When possible, use the measurement you’ll have during real use so the fit is accurate and comfortable.
How do I convert my measurement to helmet size (S/M/L or inches/cm)?
After you measure your head circumference, match it to the manufacturer’s size chart. Helmet brands often differ in how they map inches/cm to sizes, so always use the specific chart for the helmet you plan to buy. As a general approach, find the closest circumference value on the chart and choose the size range that includes your measurement. If your number falls between sizes, many guidelines recommend choosing the larger size for comfort and proper circulation, then using the helmet’s fit system (pads/adjustment dial) to fine-tune. However, some helmets require a snug baseline fit—so check that brand’s fit recommendations.
How can I tell if the helmet fits correctly after measuring?
A correct measurement helps you choose the right size, but final fit is determined by how the helmet sits. Once worn, the helmet should sit level on your head and cover the forehead without obstructing vision. The fit should be snug all around—no major gaps—without causing pressure points or headaches. When you try to move the helmet, it shouldn’t shift excessively; ideally, it should feel secure with minimal movement. The retention straps should form a comfortable “Y” under your ears, and the buckle should be snug (not loose enough to slip). Most important: you should be able to wear it comfortably for at least several minutes; if it causes pain, numbness, or strong hotspots, reassess the size or adjust the fit system.
References
- Measuring head impacts: accelerometers and other sensors Google Scholar
https://www.sciencedirect.com/science/article/pii/B9780444639547000239 - Consensus head acceleration measurement practices (CHAMP): laboratory validation of wearable head… Google Scholar
https://link.springer.com/article/10.1007/s10439-022-03066-0 - Principles of fit to optimize helmet sizing Google Scholar
https://apps.dtic.mil/sti/html/tr/ADA460142/ - Measurement of impact acceleration: mouthpiece accelerometer versus helmet accelerometer Google Scholar
https://pmc.ncbi.nlm.nih.gov/articles/PMC1896070/ - Human head modeling and personal head protective equipment: A literature review Google Scholar
https://link.springer.com/chapter/10.1007/978-3-642-02809-0_70
📅 Last Updated: July 06, 2026 | Topic: The Essential Guide to Measuring Your Head for a Helmet | Content verified for accuracy and freshness.